
Learn how to replace a garage door opener battery in Keller TX! Simple steps for safe, fast replacement — perfect for local homeowners.
In today’s fast-paced world, few things are as frustrating as a garage door that won’t open when you’re running late for work or caught in a sudden Texas downpour. A functioning garage door opener battery is essential for the security and convenience of your home. For Keller, TX homeowners, proactive maintenance isn’t just a good idea—it’s necessary to combat the effects of the region’s extreme weather patterns.
Keller TX Garage Door professionals recommend regular battery checks to ensure your system works when needed. Learning how to replace garage door opener batteries quickly can save you time, money, and the headache of unexpected malfunctions while maximizing both safety and convenience for your family.
Why Battery Replacement Matters for Keller TX Garage Door Professionals
The opener battery plays a crucial role in modern garage door systems, serving as the primary power source for remotes and the backup power during outages. Recognizing when your battery is failing can prevent inconvenient lockouts and security vulnerabilities.
Several signs indicate your garage door opener’s battery is nearing the end of its lifespan. You might notice increasingly slow response times when activating the opener, a complete lack of action despite pressing buttons multiple times, blinking lights on the remote or wall console, or intermittent operation that seems to worsen with each use.
Keller’s unique climate presents additional challenges for new garage door systems. The intense summer heat, which regularly exceeds 100°F, combined with periods of high humidity, can significantly reduce battery life. During winter months, sudden temperature drops can further stress battery components. These climate factors typically reduce battery lifespan by 15-20% compared to more moderate regions, making regular replacement even more critical for Keller residents.
Tools & Materials You’ll Need for Battery Replacement
Before beginning the replacement process, gather these essential items.
- Replacement battery (verify the correct type for your specific model)
- CR2032 (common in newer remotes)
- A23 (found in many keyless entry pads)
- 9V (typically used in backup battery systems)
- CR2032 (common in newer remotes)
- Appropriate screwdriver (Phillips or flathead, depending on your model)
- Clean cloth for wiping away dust or corrosion
- Disposable gloves to protect the new battery from oils on your hands
- Optional: Backup power source during replacement (especially for security systems)
Preparing these materials in advance ensures a quick and seamless replacement process, eliminating the need for unnecessary trips to the hardware store.

Step-by-Step Guide: How to Replace Garage Door Opener Battery
Step 1 — Identify Your Garage Door Opener Model
Knowing your exact garage door opener brand and model is crucial for selecting the correct replacement battery. Popular brands in the Keller area include LiftMaster, Chamberlain, Genie, and Craftsman.
You can typically find model information on the back or bottom of your remote control, inside the battery compartment, on a label attached to the main opener unit mounted on your garage ceiling, in your owner’s manual, or on the original packaging.
Taking a clear photo of this information before heading to the store can help ensure you purchase the correct replacement battery.
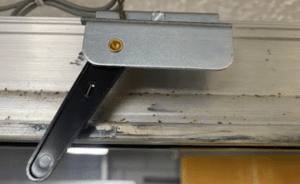
Step 2 — Locate the Battery Compartment
Depending on your system, the battery may be located in one of several places.
For remote controls:
- Look for a small sliding panel or tab on the back or bottom
- Some models require pressing a release button to access the compartment
- Older models might need a small screwdriver to remove a panel
For wall keypads:
- The battery compartment is typically at the bottom of the unit
- It may require sliding the entire keypad up to remove it from its mounting bracket
- Some models have a hinged door or a removable cover
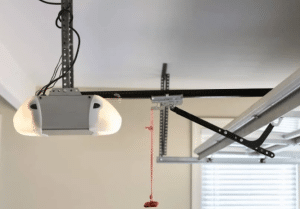
For backup battery boxes:
- Usually located on or near the central opener unit in the garage
- It often appears as a rectangular box with a removable cover
- May have indicator lights showing battery status
Safety tip: Always unplug the garage door opener from electrical power before working on any internal components to prevent electrical shock.
Step 3 — Remove and Replace the Battery
Follow these precise steps for a successful replacement. First, open the battery compartment carefully, noting the position of the old battery. Remove the old battery, noting which side faces up (and identifying the + and – markings). Inspect the compartment for any signs of corrosion, such as white, green, or blue powdery residue. If corrosion is present, gently clean the contacts with a dry cloth or cotton swab. Insert the new battery in the same orientation as the old one.
Confirm proper placement by checking that the battery sits flush in its compartment. Finally, securely close the compartment cover until it clicks or locks into place.
Proper alignment is critical—inserting the battery incorrectly can damage the unit or prevent it from operating.
Step 4 — Test the Garage Door Opener
Thorough testing ensures the proper function of the replacement. Start by restoring power to the opener if it is unplugged. Press the wall control button to test basic operation. Test the remote from various distances: standing directly below the opener, from your driveway, and from inside your vehicle. Finally, verify that the door stops and reverses when meeting resistance, which is a critical safety feature.
If the opener isn’t responding appropriately after battery replacement, you may need to recalibrate or reprogram the remote. Locate the “Learn” or “Program” button on your opener unit. Press and hold this button until the indicator light blinks. Press your remote button within 30 seconds. The opener light should flash, or the unit should beep to confirm successful programming.
Common Garage Door Opener Battery Types Used in Keller, TX
| Device Type | Brand | Battery Type | Voltage/Capacity |
| Remote Controls | LiftMaster/Chamberlain | CR2032 | 3V lithium coin |
| Remote Controls | Genie | CR2032 or A23 | 3V lithium or 12V alkaline |
| Remote Controls | Craftsman | CR2032 or A23 | 3V lithium or 12V alkaline |
| Remote Controls | Wayne Dalton | CR2032 or 9V | 3V lithium or 9V alkaline |
| Wall Keypads | Most Models | 9V | 9V alkaline |
| Wall Keypads | Newer Models | CR2032 | 3V lithium coin |
| Backup Battery | LiftMaster 485LM | Sealed Lead Acid | 12V 4.5Ah |
| Backup Battery | Chamberlain 4228 | Sealed Lead Acid | 12V 5Ah |
| Backup Battery | Genie GBAT | Sealed Lead Acid | 12V 7Ah |
Keller residents can find these batteries at local retailers. Major retailers and manufacturers’ websites also offer online options with quick delivery.
Benefits of Replacing Garage Door Batteries Regularly in Keller, TX
| Benefit Category | Specific Advantages |
| Prevent Unexpected Lockouts | Avoid being stuck outside during extreme weather. Eliminate the frustration of garage access issues when in a hurry. Maintain reliable access for all family members. |
| Enhanced Home Security | Ensure backup power during Keller’s occasional storm-related outages. Maintain security system integration with your garage door. Prevent opportunities for unauthorized access during system failures. |
| Smooth Operation Throughout Seasonal Changes | Consistent performance during Keller’s hot summers. Reliable operation during winter cold snaps. Reduced strain on mechanical components due to a consistent power supply. |
| Extended Opener Lifespan | Consistent power delivery reduces wear on motor components. Prevents damage from voltage fluctuations. Reduces the frequency of more expensive garage door repairs. |
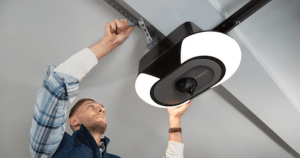
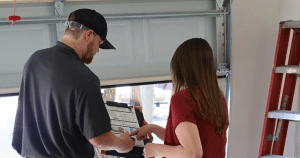
When to Call a Keller TX Garage Door Professional
While battery replacement is typically a DIY-friendly task, certain situations warrant professional assistance from Keller TX Garage Door.
- If battery replacement doesn’t resolve operational issues.
- Persistent motor problems
- Unusual noises during the operation
- Erratic movement or partial opening/closing
- Persistent motor problems
- When you discover
- Significant corrosion on battery terminals or wiring
- Damaged wiring or connectors
- Cracked or damaged battery compartments
- Signs of water damage to electrical components
- Significant corrosion on battery terminals or wiring
- For preventative maintenance:
- Annual safety inspections
- Complete system testing
- Professional lubrication and adjustment
- Safety sensor alignment and testing
- Annual safety inspections
Professional technicians have the tools and expertise to diagnose complex issues that may extend beyond simple battery problems.

Frequently Asked Questions
How do I know if my garage door opener battery is dead?
The most common indicators include slow or completely non-responsive remote operation, flashing indicator lights on your remote or wall console, and warning beeps from the opener unit. If your remote works inconsistently or requires multiple button presses to activate, this typically signals a weakening battery.
What kind of battery does a garage door opener use?
Most remote controls use CR2032 (3V lithium coin) or A23 (12V alkaline) batteries. Wall keypads typically use 9V alkaline batteries. Backup battery systems for the central opener unit generally use 12V sealed lead-acid batteries. Always check your specific model’s manual to confirm the required battery type.
Can I replace a garage door opener battery myself?
Yes, most battery replacements are simple DIY projects that require only basic tools, such as a screwdriver. The process typically takes less than 10 minutes for remotes and keypads and about 15-20 minutes for backup battery systems. Ensure you purchase the correct battery type and follow proper safety precautions during the replacement process.
How often should I replace the battery in my garage door opener?
Remote control batteries typically need to be replaced every 12 to 18 months, and backup batteries for the opener unit should be replaced every 2 to 3 years. Keller residents may need to replace batteries more frequently due to extreme seasonal temperature variations that can reduce battery lifespan.
Why is my garage door opener still not working after replacing the battery?
Several possibilities exist when a new battery does not resolve the issue: the remote may need reprogramming to sync with the opener, there may be electrical problems with the opener unit, safety sensors might be misaligned, or mechanical issues may affect door operation. Start with reprogramming, then check for physical obstructions before considering professional service.
End Note
Maintaining your garage door opener’s battery is a simple yet crucial aspect of home maintenance that ensures security, convenience, and peace of mind. By understanding how to replace garage door opener battery components correctly, you can avoid the frustration of unexpected failures and extend the lifespan of your entire garage door opener system. Regular battery replacement represents one of the most cost-effective preventative maintenance steps for your home’s most frequently used entryway.
If you face more complex garage door issues or prefer to leave the garage door maintenance to the experts, Keller TX Garage Door is ready to help. Our team of experienced technicians specializes in comprehensive garage door services throughout the Keller area, from simple battery replacements to complete system upgrades. We understand the unique challenges that Texas weather presents to garage door systems and offer solutions designed specifically for local conditions.
For reliable service, expert advice, or emergency assistance with any garage door needs, don’t hesitate to contact us today. We’re committed to keeping your home secure and your garage door operating flawlessly year-round.